
Sonar Summit: Your blueprint for software excellence in the AI era. Join global experts virtually on March 3rd for technical deep dives into verifying AI code, automating code review, and embracing agentic workflows across the SDLC. Register for free today.
Build Your Own AI Application Using Prebuilt Blazor Components Learn how to connect AI endpoints, manage prompt flows, stream model responses, and embed advanced UI patterns—all without writing heavy custom infrastructure. Click here to learn more.
I got hit with a security incident recently. Someone accessed an account of mine that had a strong, unique password. But no second factor.
It was a wake-up call. Passwords alone are not enough. They get phished, leaked in breaches, or brute-forced. A second factor changes the equation entirely.
Two-Factor Authentication (2FA) adds an extra verification step beyond the password. Even if an attacker steals the password, they still can't get in without the second factor. It's one of the most effective security measures you can implement, and it's not that hard to build.
In this article, I'll walk you through implementing 2FA in .NET using Time-based One-Time Passwords (TOTP) with QR codes and authenticator apps like Google Authenticator.
We'll cover:
- How TOTP works under the hood
- Generating QR codes for authenticator app setup
- The correct setup flow to avoid putting users in a bad state
- Validating one-time codes
- Encrypting user secrets at rest
Let's dive in.
How TOTP Works
TOTP (Time-based One-Time Password) is the algorithm behind apps like Google Authenticator, Microsoft Authenticator, and Authy.
The idea is simple: a shared secret is established between the server and the user's authenticator app. Both sides use that secret combined with the current time to generate a 6-digit code that changes every 30 seconds.
Here's the flow:
- The server generates a unique secret key for the user
- The user scans a QR code containing that secret into their authenticator app
- Both the server and the app now independently generate the same time-based codes
- At login, the user enters the current code from their app, and the server verifies it
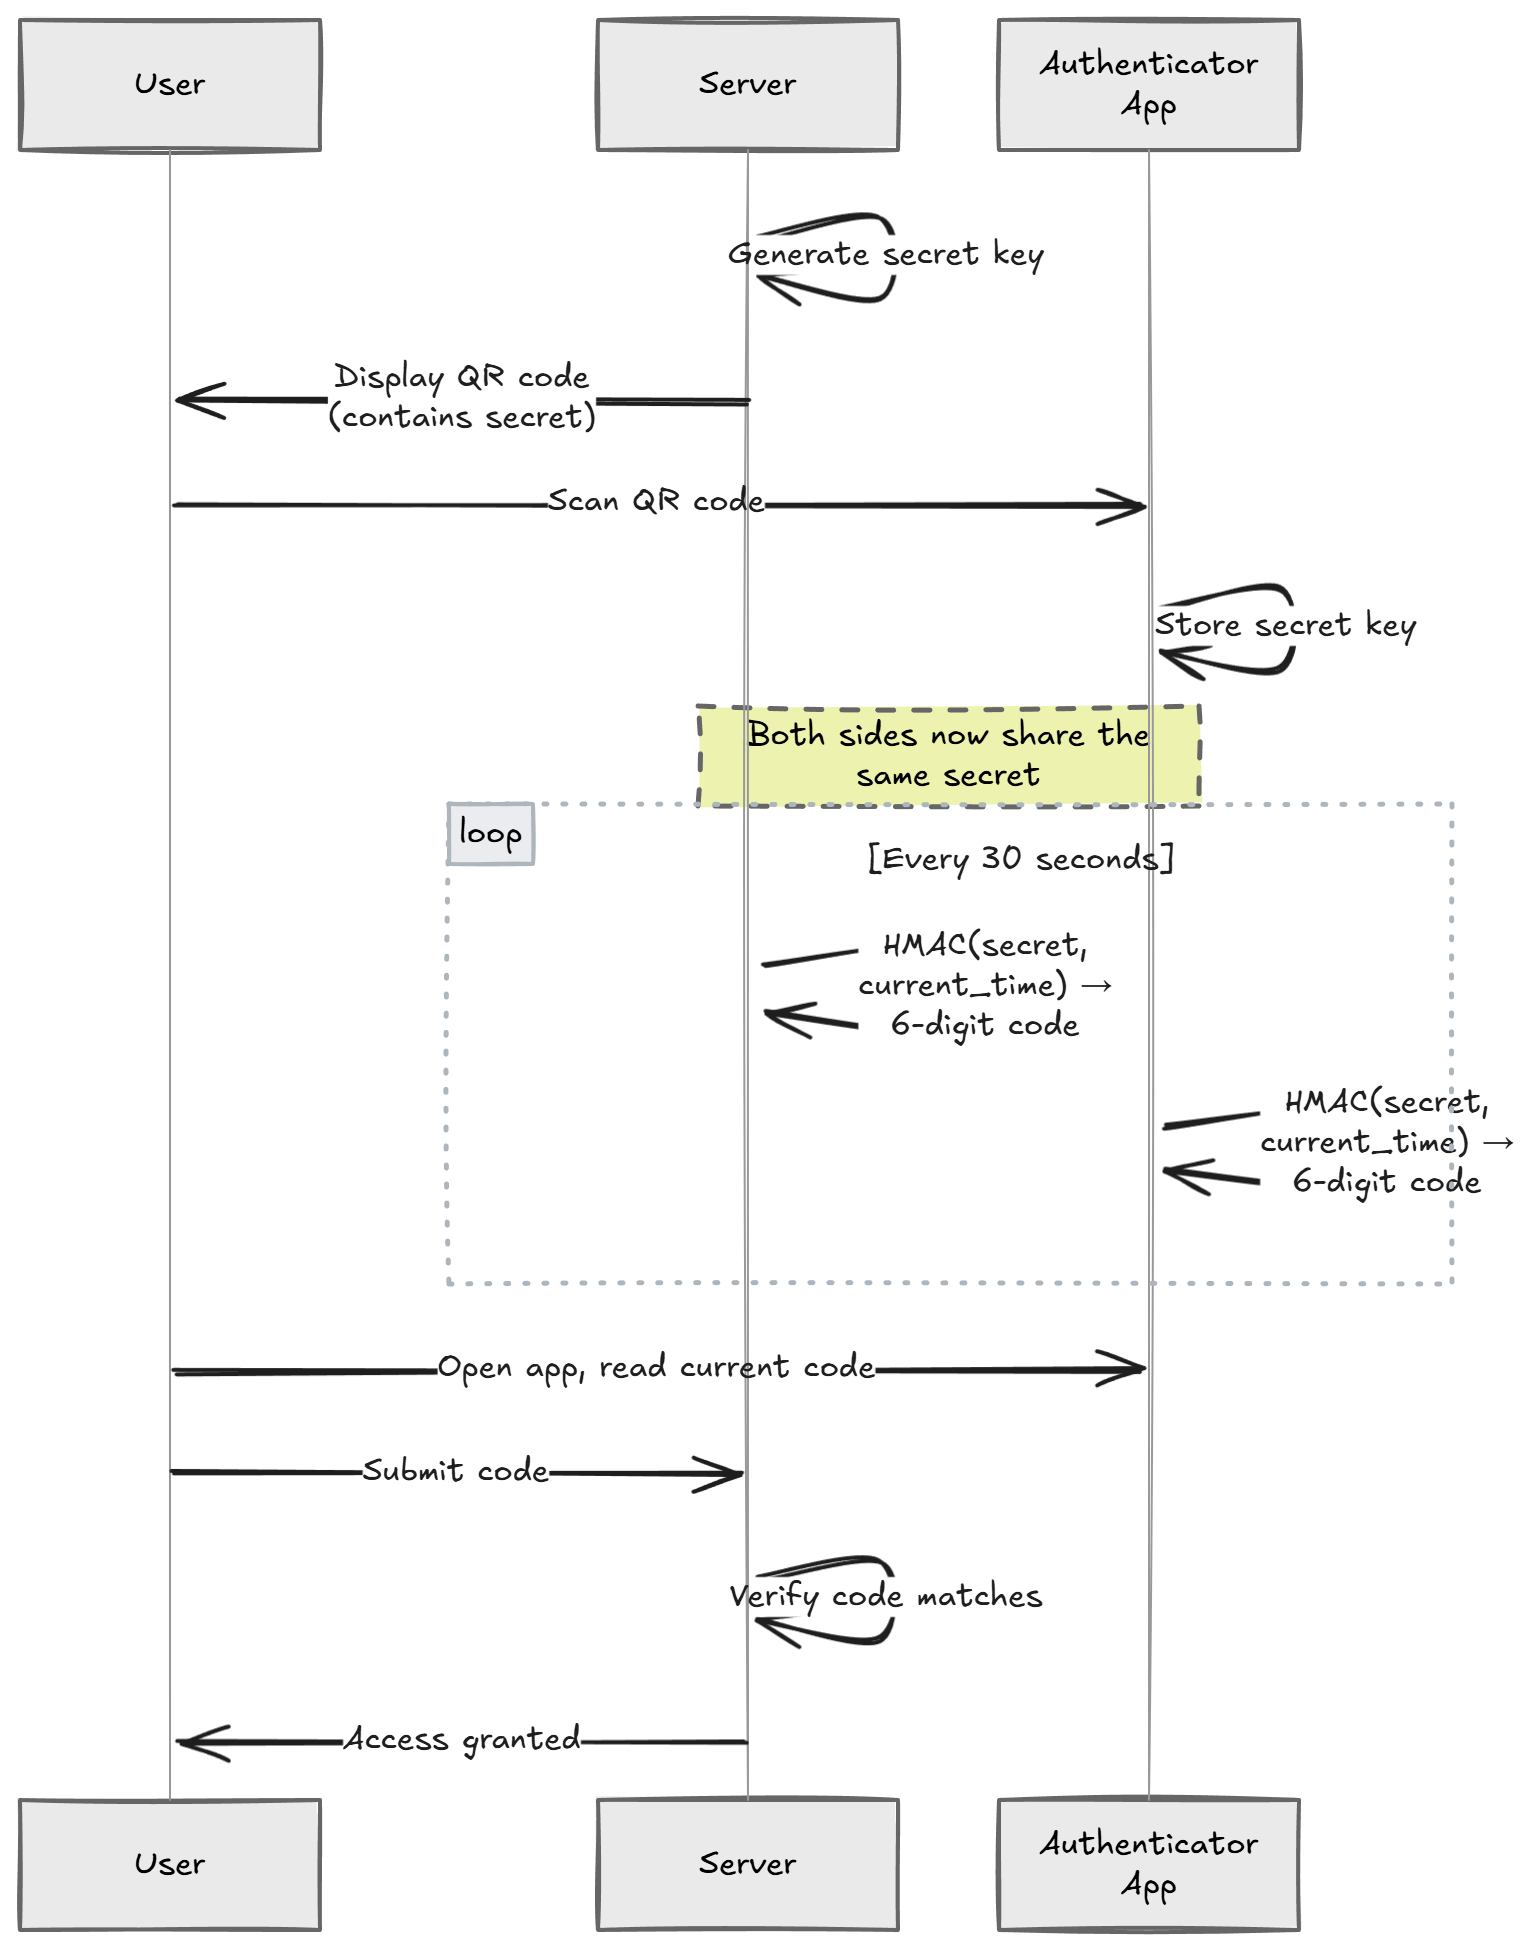
Because both sides compute the code independently, there's no network call to validate. The server just checks: "given this secret and the current time, does the code match?"
This makes TOTP fast, offline-capable, and resistant to replay attacks (each code is only valid for a short window).
Generating the Secret Key
Every user needs their own unique secret key. This key is the foundation of the entire 2FA system, so it must be cryptographically random.
We'll use the Otp.NET library for TOTP operations:
dotnet add package Otp.NET
Generate a secret key for a user:
using OtpNet;

byte[] secretKey = KeyGeneration.GenerateRandomKey(); // 20 bytes by default (SHA-1)
string base32Secret = Base32Encoding.ToString(secretKey);
KeyGeneration.GenerateRandomKey() produces a cryptographically secure random key.
We encode it as Base32 because that's what the otpauth URI scheme expects.
This secret must be stored securely. It's the equivalent of a password. If an attacker gets the secret, they can generate valid codes. I'll cover encrypting it at rest later in this article.
Creating the QR Code
To set up 2FA, the user needs to scan a QR code with their authenticator app.
The QR code encodes an otpauth:// URI that contains the secret key and metadata.
Install the QRCoder library:
dotnet add package QRCoder
Here's how to generate the QR code:
using QRCoder;

const string issuer = "MyApp";
const string user = "user@example.com";

string escapedIssuer = Uri.EscapeDataString(issuer);
string escapedUser = Uri.EscapeDataString(user);

string otpUri =
    $"otpauth://totp/{escapedIssuer}:{escapedUser}" +
    $"?secret={base32Secret}" +
    $"&issuer={escapedIssuer}" +
    $"&digits=6" +
    $"&period=30";

using var qrGenerator = new QRCodeGenerator();
using var qrCodeData = qrGenerator.CreateQrCode(otpUri, QRCodeGenerator.ECCLevel.Q);
using var qrCode = new PngByteQRCode(qrCodeData);
byte[] qrCodeImage = qrCode.GetGraphic(10);
Let's unpack the otpauth:// URI parameters:
secret- The Base32-encoded shared secretissuer- Your application name (shown in the authenticator app)digits- Number of digits in the code (standard is 6)period- How often the code rotates in seconds (standard is 30)
The ECCLevel.Q gives us a good balance between error correction and QR code size.
It means the QR code can still be scanned even if about 25% of it is damaged or obscured.
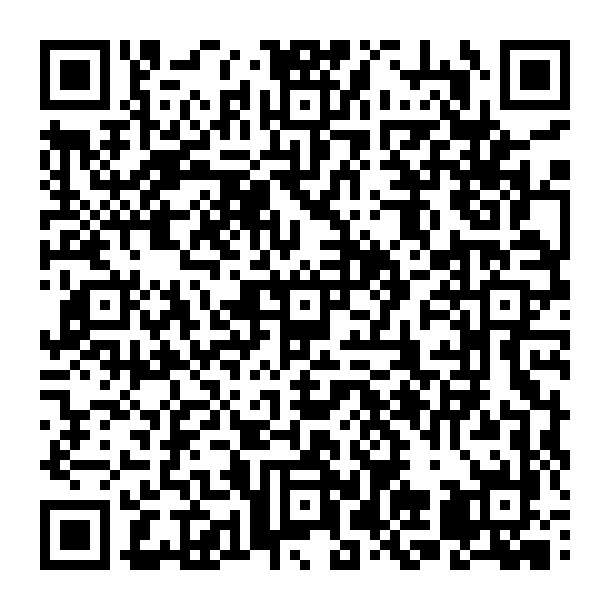
Here's what the generated QR code looks like:
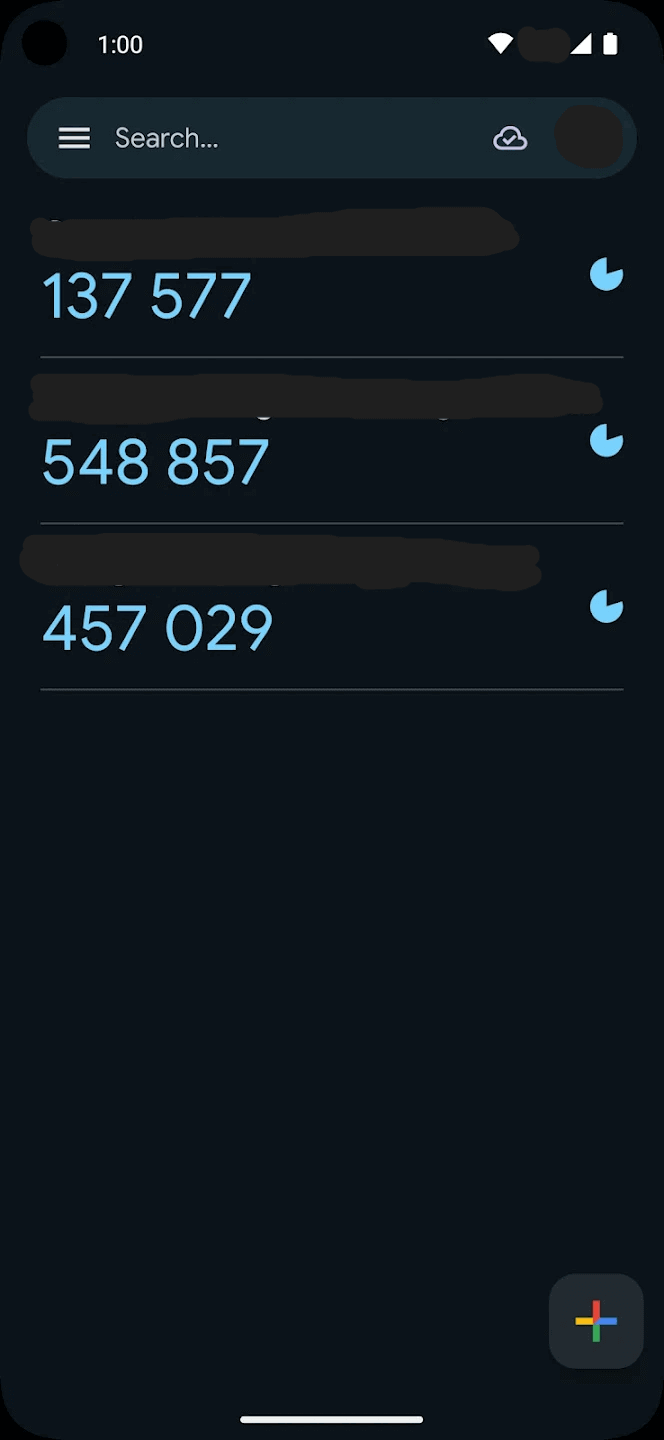
And once the user scans it, the entry appears in their authenticator app:
You can also display the base32Secret string alongside the QR code.
Some users prefer to type it in manually.
The Setup Flow
Getting the setup flow right is critical. If you enable 2FA the moment the user requests it, before they've even scanned the QR code, you've locked them out.
Here's the correct flow:
- User requests 2FA setup - Generate a secret key and store it as pending (not yet active)
- Show the QR code - The user scans it with their authenticator app
- User enters the first code - This proves they successfully set up their authenticator app
- Server validates the code - If it matches, activate 2FA for the user
- Generate recovery codes - Give the user backup codes in case they lose their device
The key insight is step 3. Never enable 2FA until the user has confirmed they can generate valid codes. Otherwise, you'll end up with users who have 2FA "enabled" but no way to generate codes.
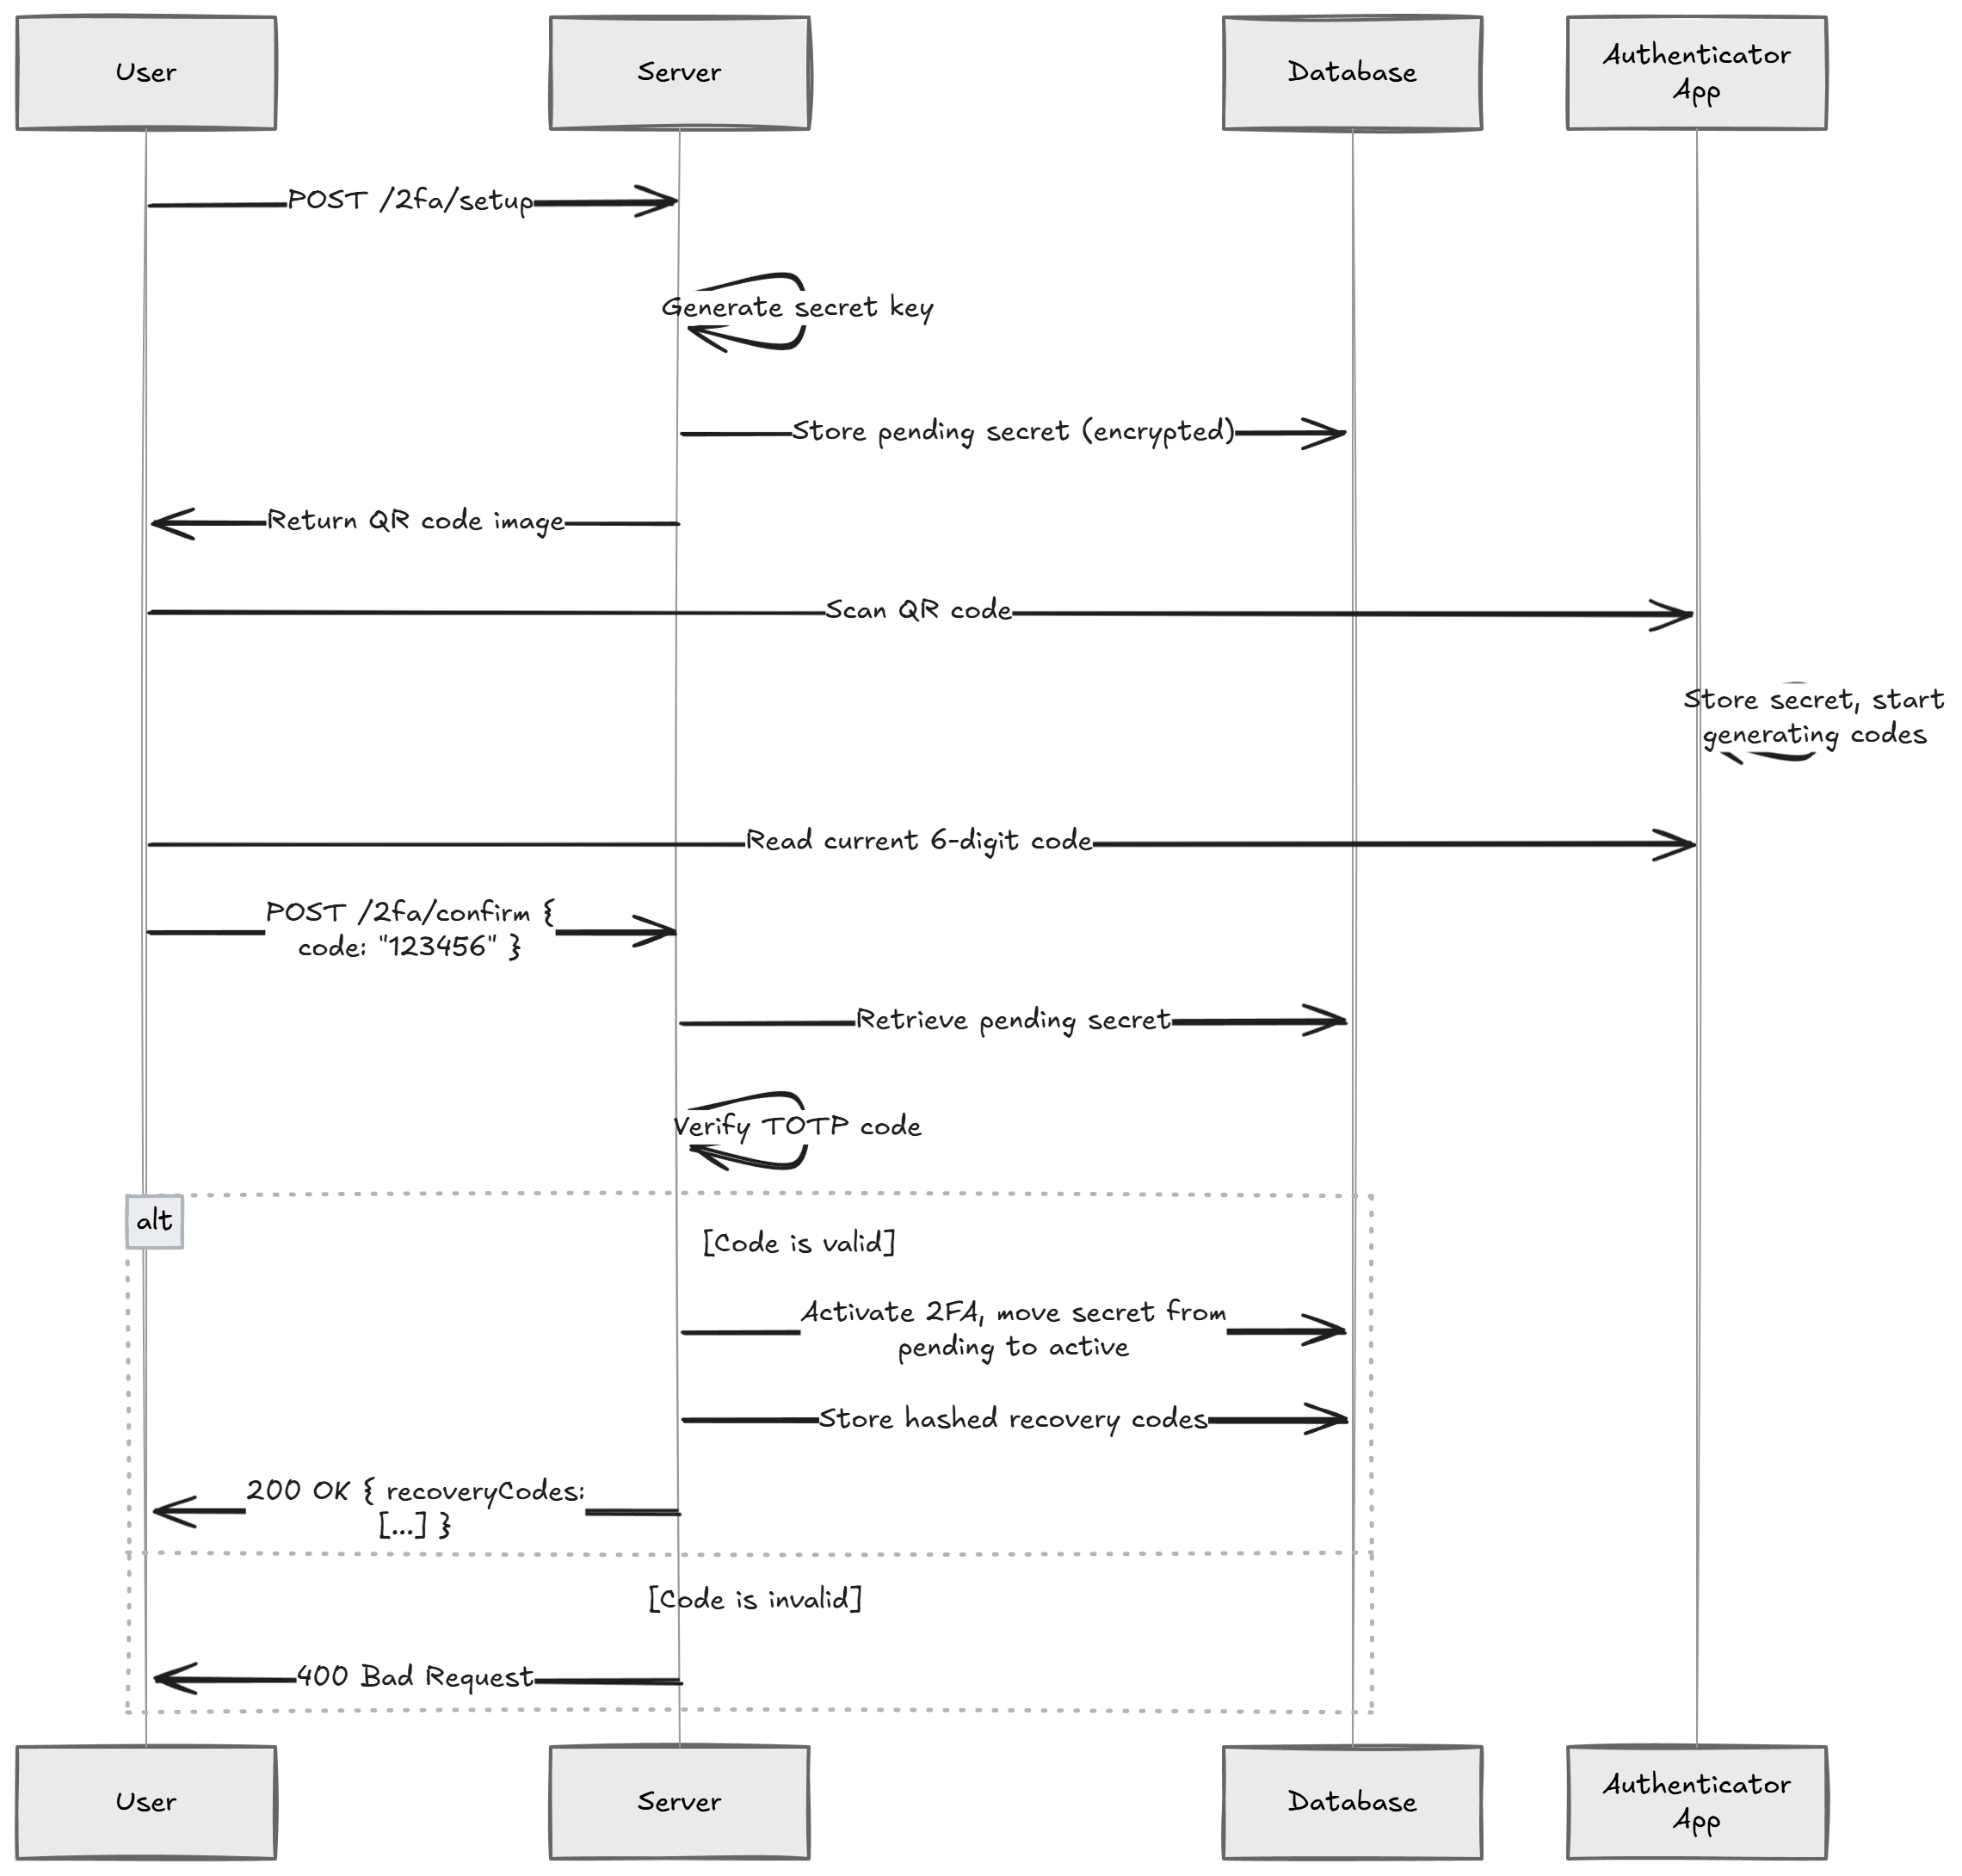
Here's what the API endpoints look like.
All 2FA endpoints must be protected, the user has to be authenticated first.
The best practice is to use .RequireAuthorization() on each endpoint:
app.MapPost("2fa/setup", async (HttpContext context, UserService userService) =>
{
    var userId = context.User.GetUserId();

    byte[] secretKey = KeyGeneration.GenerateRandomKey();
    string base32Secret = Base32Encoding.ToString(secretKey);

    // Store the pending secret (encrypted) - NOT yet active
    await userService.StorePendingTwoFactorSecret(userId, base32Secret);

    string otpUri =
        $"otpauth://totp/{Uri.EscapeDataString("MyApp")}:{Uri.EscapeDataString(userId)}" +
        $"?secret={base32Secret}" +
        $"&issuer={Uri.EscapeDataString("MyApp")}" +
        $"&digits=6&period=30";

    using var qrGenerator = new QRCodeGenerator();
    using var qrCodeData = qrGenerator.CreateQrCode(otpUri, QRCodeGenerator.ECCLevel.Q);
    using var qrCode = new PngByteQRCode(qrCodeData);
    byte[] qrCodeImage = qrCode.GetGraphic(10);

    return Results.File(qrCodeImage, "image/png");
})
.RequireAuthorization();
And the confirmation endpoint:
app.MapPost("2fa/confirm", async (
    ConfirmTwoFactorRequest request,
    HttpContext context,
    UserService userService) =>
{
    var userId = context.User.GetUserId();

    string? pendingSecret = await userService.GetPendingTwoFactorSecret(userId);
    if (pendingSecret is null)
    {
        return Results.BadRequest("No pending 2FA setup found.");
    }

    byte[] secretKey = Base32Encoding.ToBytes(pendingSecret);
    var totp = new Totp(secretKey);

    bool isValid = totp.VerifyTotp(
        request.Code,
        out _,
        VerificationWindow.RfcSpecifiedNetworkDelay);

    if (!isValid)
    {
        return Results.BadRequest("Invalid code. Please try again.");
    }

    // Code is valid - activate 2FA
    await userService.ActivateTwoFactor(userId, pendingSecret);

    // Generate recovery codes
    var recoveryCodes = await userService.GenerateRecoveryCodes(userId);

    return Results.Ok(new { recoveryCodes });
})
.RequireAuthorization();

internal record ConfirmTwoFactorRequest(string Code);
This two-step approach guarantees you never activate 2FA for a user who can't actually use it. If the user abandons the setup halfway through, the pending secret gets cleaned up and nothing breaks.
The Login Flow With 2FA
Here's a critical point that's easy to get wrong: don't issue a full access token until the user passes the 2FA check.
If a user has 2FA enabled and you issue a JWT after they enter their password, you've already given them full access. The 2FA step becomes meaningless.
The correct approach is a two-step login:
- The user submits their username and password
- If credentials are valid and 2FA is enabled, return a limited-scope token (or session) that only allows calling the
2fa/validateendpoint - The user submits their TOTP code
- If the code is valid, issue the full access token
app.MapPost("auth/login", async (LoginRequest request, UserService userService) =>
{
    var user = await userService.ValidateCredentials(request.Email, request.Password);
    if (user is null)
    {
        return Results.Unauthorized();
    }

    if (user.TwoFactorEnabled)
    {
        // Issue a short-lived, limited token that only permits 2FA validation
        var limitedToken = TokenService.GenerateLimitedToken(user.Id, purpose: "2fa");

        return Results.Ok(new { requiresTwoFactor = true, token = limitedToken });
    }

    // No 2FA - issue full access token
    var accessToken = TokenService.GenerateAccessToken(user);

    return Results.Ok(new { accessToken });
});
The limited token should have a short expiration (2-3 minutes) and a claim or scope that restricts it to the 2fa/validate endpoint only.
Your authorization policy on the validation endpoint can check for this specific claim.
This way, a stolen password alone never results in a full access token.
Validating TOTP Codes
Once 2FA is active, you need to validate codes during login. Here's the validation logic:
app.MapPost("2fa/validate", async (
    ValidateOtpRequest request,
    HttpContext context,
    UserService userService) =>
{
    var userId = context.User.GetUserId();

    string? secret = await userService.GetTwoFactorSecret(userId);
    if (secret is null)
    {
        return Results.BadRequest("2FA is not enabled.");
    }

    byte[] secretKey = Base32Encoding.ToBytes(secret);
    var totp = new Totp(secretKey);

    bool isValid = totp.VerifyTotp(
        request.Code,
        out long timeStepMatched,
        VerificationWindow.RfcSpecifiedNetworkDelay);

    return Results.Ok(new { isValid });
})
.RequireAuthorization();

internal record ValidateOtpRequest(string Code);
The VerificationWindow.RfcSpecifiedNetworkDelay parameter is important.
It allows a small window of tolerance around the current time step.
This accounts for clock drift between the server and the user's device.
Without a verification window, a code that was valid 2 seconds ago might be rejected because the server crossed into the next 30-second period. The RFC-specified window typically allows one time step before and after the current one.
Preventing Code Reuse
One subtle but important point: a TOTP code should only be accepted once.
If an attacker intercepts a valid code (e.g., through shoulder surfing), they shouldn't be able to reuse it.
The timeStepMatched output parameter tells you which time step the code belongs to.
You can store the last used time step and reject any code from the same or earlier step:
bool isValid = totp.VerifyTotp(
    request.Code,
    out long timeStepMatched,
    VerificationWindow.RfcSpecifiedNetworkDelay);

if (isValid)
{
    long? lastUsedTimeStep = await userService.GetLastUsedTimeStep(userId);

    if (lastUsedTimeStep.HasValue && timeStepMatched <= lastUsedTimeStep.Value)
    {
        return Results.BadRequest("Code already used.");
    }

    await userService.UpdateLastUsedTimeStep(userId, timeStepMatched);
}
This prevents replay attacks within the verification window.
Rate Limiting
The validation endpoint is a brute-force target. A 6-digit code has only 1,000,000 possible combinations. Without rate limiting, an attacker could try all of them in minutes.
At a minimum, you should:
- Limit attempts per user - Lock the account or add a delay after 3-5 failed attempts
- Use exponential backoff - Double the wait time after each failure
- Log failed attempts - Unusual patterns (many failures from one IP) are a red flag
ASP.NET Core has a built-in rate limiting middleware that makes this straightforward to add.
Encrypting Secrets at Rest
The TOTP secret key is the most sensitive piece of data in your 2FA system. If someone dumps your database, they shouldn't be able to generate valid codes for your users.
Never store TOTP secrets in plain text.
Encrypt them before writing to the database and decrypt only when you need to verify a code. I covered this in detail in my article on implementing AES encryption with C#.
Here's the general approach:
public class UserService
{
    private readonly IEncryptionService _encryptionService;

    public async Task StorePendingTwoFactorSecret(string userId, string secret)
    {
        string encryptedSecret = _encryptionService.Encrypt(secret);

        // Store encryptedSecret in the database
        await _dbContext.Users
            .Where(u => u.Id == userId)
            .ExecuteUpdateAsync(u => u
                .SetProperty(x => x.PendingTwoFactorSecret, encryptedSecret));
    }

    public async Task<string?> GetTwoFactorSecret(string userId)
    {
        var user = await _dbContext.Users.FindAsync(userId);
        if (user?.TwoFactorSecret is null) return null;

        return _encryptionService.Decrypt(user.TwoFactorSecret);
    }
}
The encryption key itself should live in a key management service like
Azure Key Vault,
AWS KMS, or
HashiCorp Vault.
Never store it in your appsettings.json or source code.
Recovery Codes
What happens when a user loses their phone?
Without a recovery mechanism, they're permanently locked out of their account. Recovery codes solve this. They're one-time-use codes generated when the user enables 2FA.
public async Task<List<string>> GenerateRecoveryCodes(string userId, int count = 8)
{
    var codes = new List<string>();

    for (int i = 0; i < count; i++)
    {
        // Generate a cryptographically random code
        var bytes = RandomNumberGenerator.GetBytes(5);
        var code = Convert.ToHexString(bytes).ToLower();
        codes.Add(code);
    }

    // Hash the codes before storing (same as passwords - one-way)
    var hashedCodes = codes
        .Select(c => BCrypt.Net.BCrypt.HashPassword(c))
        .ToList();

    await _dbContext.RecoveryCodes
        .Where(rc => rc.UserId == userId)
        .ExecuteDeleteAsync();

    _dbContext.RecoveryCodes.AddRange(
        hashedCodes.Select(h => new RecoveryCode
        {
            UserId = userId,
            CodeHash = h,
            IsUsed = false
        }));

    await _dbContext.SaveChangesAsync();

    // Return plain text codes to show the user ONCE
    return codes;
}
A few important details:
- Hash the recovery codes before storing them. They're single-use passwords.
Use
bcrypt(e.g. Bcrypt.Net) or similar. - Show them only once. After the user dismisses the dialog, the plain text codes are gone.
- Mark codes as used. Each recovery code works exactly once.
- Generate enough codes. Eight to ten is standard. The user can regenerate them if they run low.
When validating a recovery code, check each stored hash until you find a match:
public async Task<bool> ValidateRecoveryCode(string userId, string code)
{
    var storedCodes = await _dbContext.RecoveryCodes
        .Where(rc => rc.UserId == userId && !rc.IsUsed)
        .ToListAsync();

    var matchingCode = storedCodes
        .FirstOrDefault(rc => BCrypt.Net.BCrypt.Verify(code, rc.CodeHash));

    if (matchingCode is null) return false;

    matchingCode.IsUsed = true;
    await _dbContext.SaveChangesAsync();

    return true;
}
Putting It All Together
Here's a minimal but complete setup showing the full 2FA flow.
I'm using a route group with .RequireAuthorization() so every endpoint underneath is protected:
using OtpNet;
using QRCoder;

var builder = WebApplication.CreateBuilder(args);

builder.Services.AddAuthentication().AddJwtBearer();
builder.Services.AddAuthorization();

var app = builder.Build();

app.UseAuthentication();
app.UseAuthorization();

var twoFactorGroup = app.MapGroup("2fa").RequireAuthorization();

twoFactorGroup.MapPost("setup", async (HttpContext context, UserService userService) =>
{
    var userId = context.User.GetUserId();

    byte[] secretKey = KeyGeneration.GenerateRandomKey();
    string base32Secret = Base32Encoding.ToString(secretKey);

    await userService.StorePendingTwoFactorSecret(userId, base32Secret);

    string otpUri =
        $"otpauth://totp/{Uri.EscapeDataString("MyApp")}:{Uri.EscapeDataString(userId)}" +
        $"?secret={base32Secret}" +
        $"&issuer={Uri.EscapeDataString("MyApp")}" +
        $"&digits=6&period=30";

    using var qrGenerator = new QRCodeGenerator();
    using var qrCodeData = qrGenerator.CreateQrCode(otpUri, QRCodeGenerator.ECCLevel.Q);
    using var qrCode = new PngByteQRCode(qrCodeData);
    byte[] qrCodeImage = qrCode.GetGraphic(10);

    return Results.File(qrCodeImage, "image/png");
});

twoFactorGroup.MapPost("confirm", async (
    ConfirmTwoFactorRequest request,
    HttpContext context,
    UserService userService) =>
{
    var userId = context.User.GetUserId();

    string? pendingSecret = await userService.GetPendingTwoFactorSecret(userId);
    if (pendingSecret is null)
    {
        return Results.BadRequest("No pending 2FA setup found.");
    }

    byte[] secretKey = Base32Encoding.ToBytes(pendingSecret);
    var totp = new Totp(secretKey);

    bool isValid = totp.VerifyTotp(
        request.Code,
        out _,
        VerificationWindow.RfcSpecifiedNetworkDelay);

    if (!isValid)
    {
        return Results.BadRequest("Invalid code. Please try again.");
    }

    await userService.ActivateTwoFactor(userId, pendingSecret);
    var recoveryCodes = await userService.GenerateRecoveryCodes(userId);

    return Results.Ok(new { recoveryCodes });
});

twoFactorGroup.MapPost("validate", async (
    ValidateOtpRequest request,
    HttpContext context,
    UserService userService) =>
{
    var userId = context.User.GetUserId();

    string? secret = await userService.GetTwoFactorSecret(userId);
    if (secret is null)
    {
        return Results.BadRequest("2FA is not enabled.");
    }

    byte[] secretKey = Base32Encoding.ToBytes(secret);
    var totp = new Totp(secretKey);

    bool isValid = totp.VerifyTotp(
        request.Code,
        out long timeStepMatched,
        VerificationWindow.RfcSpecifiedNetworkDelay);

    if (isValid)
    {
        long? lastUsedTimeStep = await userService.GetLastUsedTimeStep(userId);
        if (lastUsedTimeStep.HasValue && timeStepMatched <= lastUsedTimeStep.Value)
        {
            return Results.BadRequest("Code already used.");
        }

        await userService.UpdateLastUsedTimeStep(userId, timeStepMatched);
    }

    return Results.Ok(new { isValid });
});

app.Run();

internal record ConfirmTwoFactorRequest(string Code);
internal record ValidateOtpRequest(string Code);
If you don't need full control, Keycloak and ASP.NET Core Identity both support TOTP-based 2FA out of the box. But building it yourself is worth it when you need a custom flow or want to understand what's happening under the hood.
Summary
2FA is one of the highest-impact security features you can add to an application. TOTP with authenticator apps is a solid choice because it's offline-capable, widely supported, and doesn't depend on SMS (which is vulnerable to SIM swapping).
The important parts to get right:
- Use a proper setup flow. Generate the secret, show the QR code, and only activate 2FA after the user confirms their first code.
- Encrypt secrets at rest. The TOTP secret is as sensitive as a password. Encrypt it with AES and store keys in a key vault.
- Prevent code reuse. Track the last used time step to block replay attacks.
- Provide recovery codes. Users lose phones. Hash the codes before storing them, just like passwords.
If you're building APIs that handle sensitive operations, adding 2FA significantly raises the bar for attackers. It's not bulletproof, but it stops the vast majority of credential-based attacks.
If you're looking for a deep dive into building secure APIs with authentication and encryption, check out my Pragmatic REST APIs course.
Hope this was useful. See you next week.