Fly.io runs .NET apps where they belong: at the edge, close to users. Low latency, global reach, and simple setup. Package your .NET app, deploy with flyctl, and scale worldwide with no ops overhead. Learn how to deploy .NET with Fly.io
Smarter Refactoring for .NET Teams
Refactoring in .NET means more than cleaning up code — it’s breaking down oversized services, updating EF Core migrations,
or modernizing old layers without breaking contracts.
Augment Code
can help: it analyzes your entire solution, tracks dependencies, and applies changes consistently across files and projects.
The result: cleaner architecture, less technical debt, and zero surprises.
👉 Read the full guide on AI-assisted refactoring
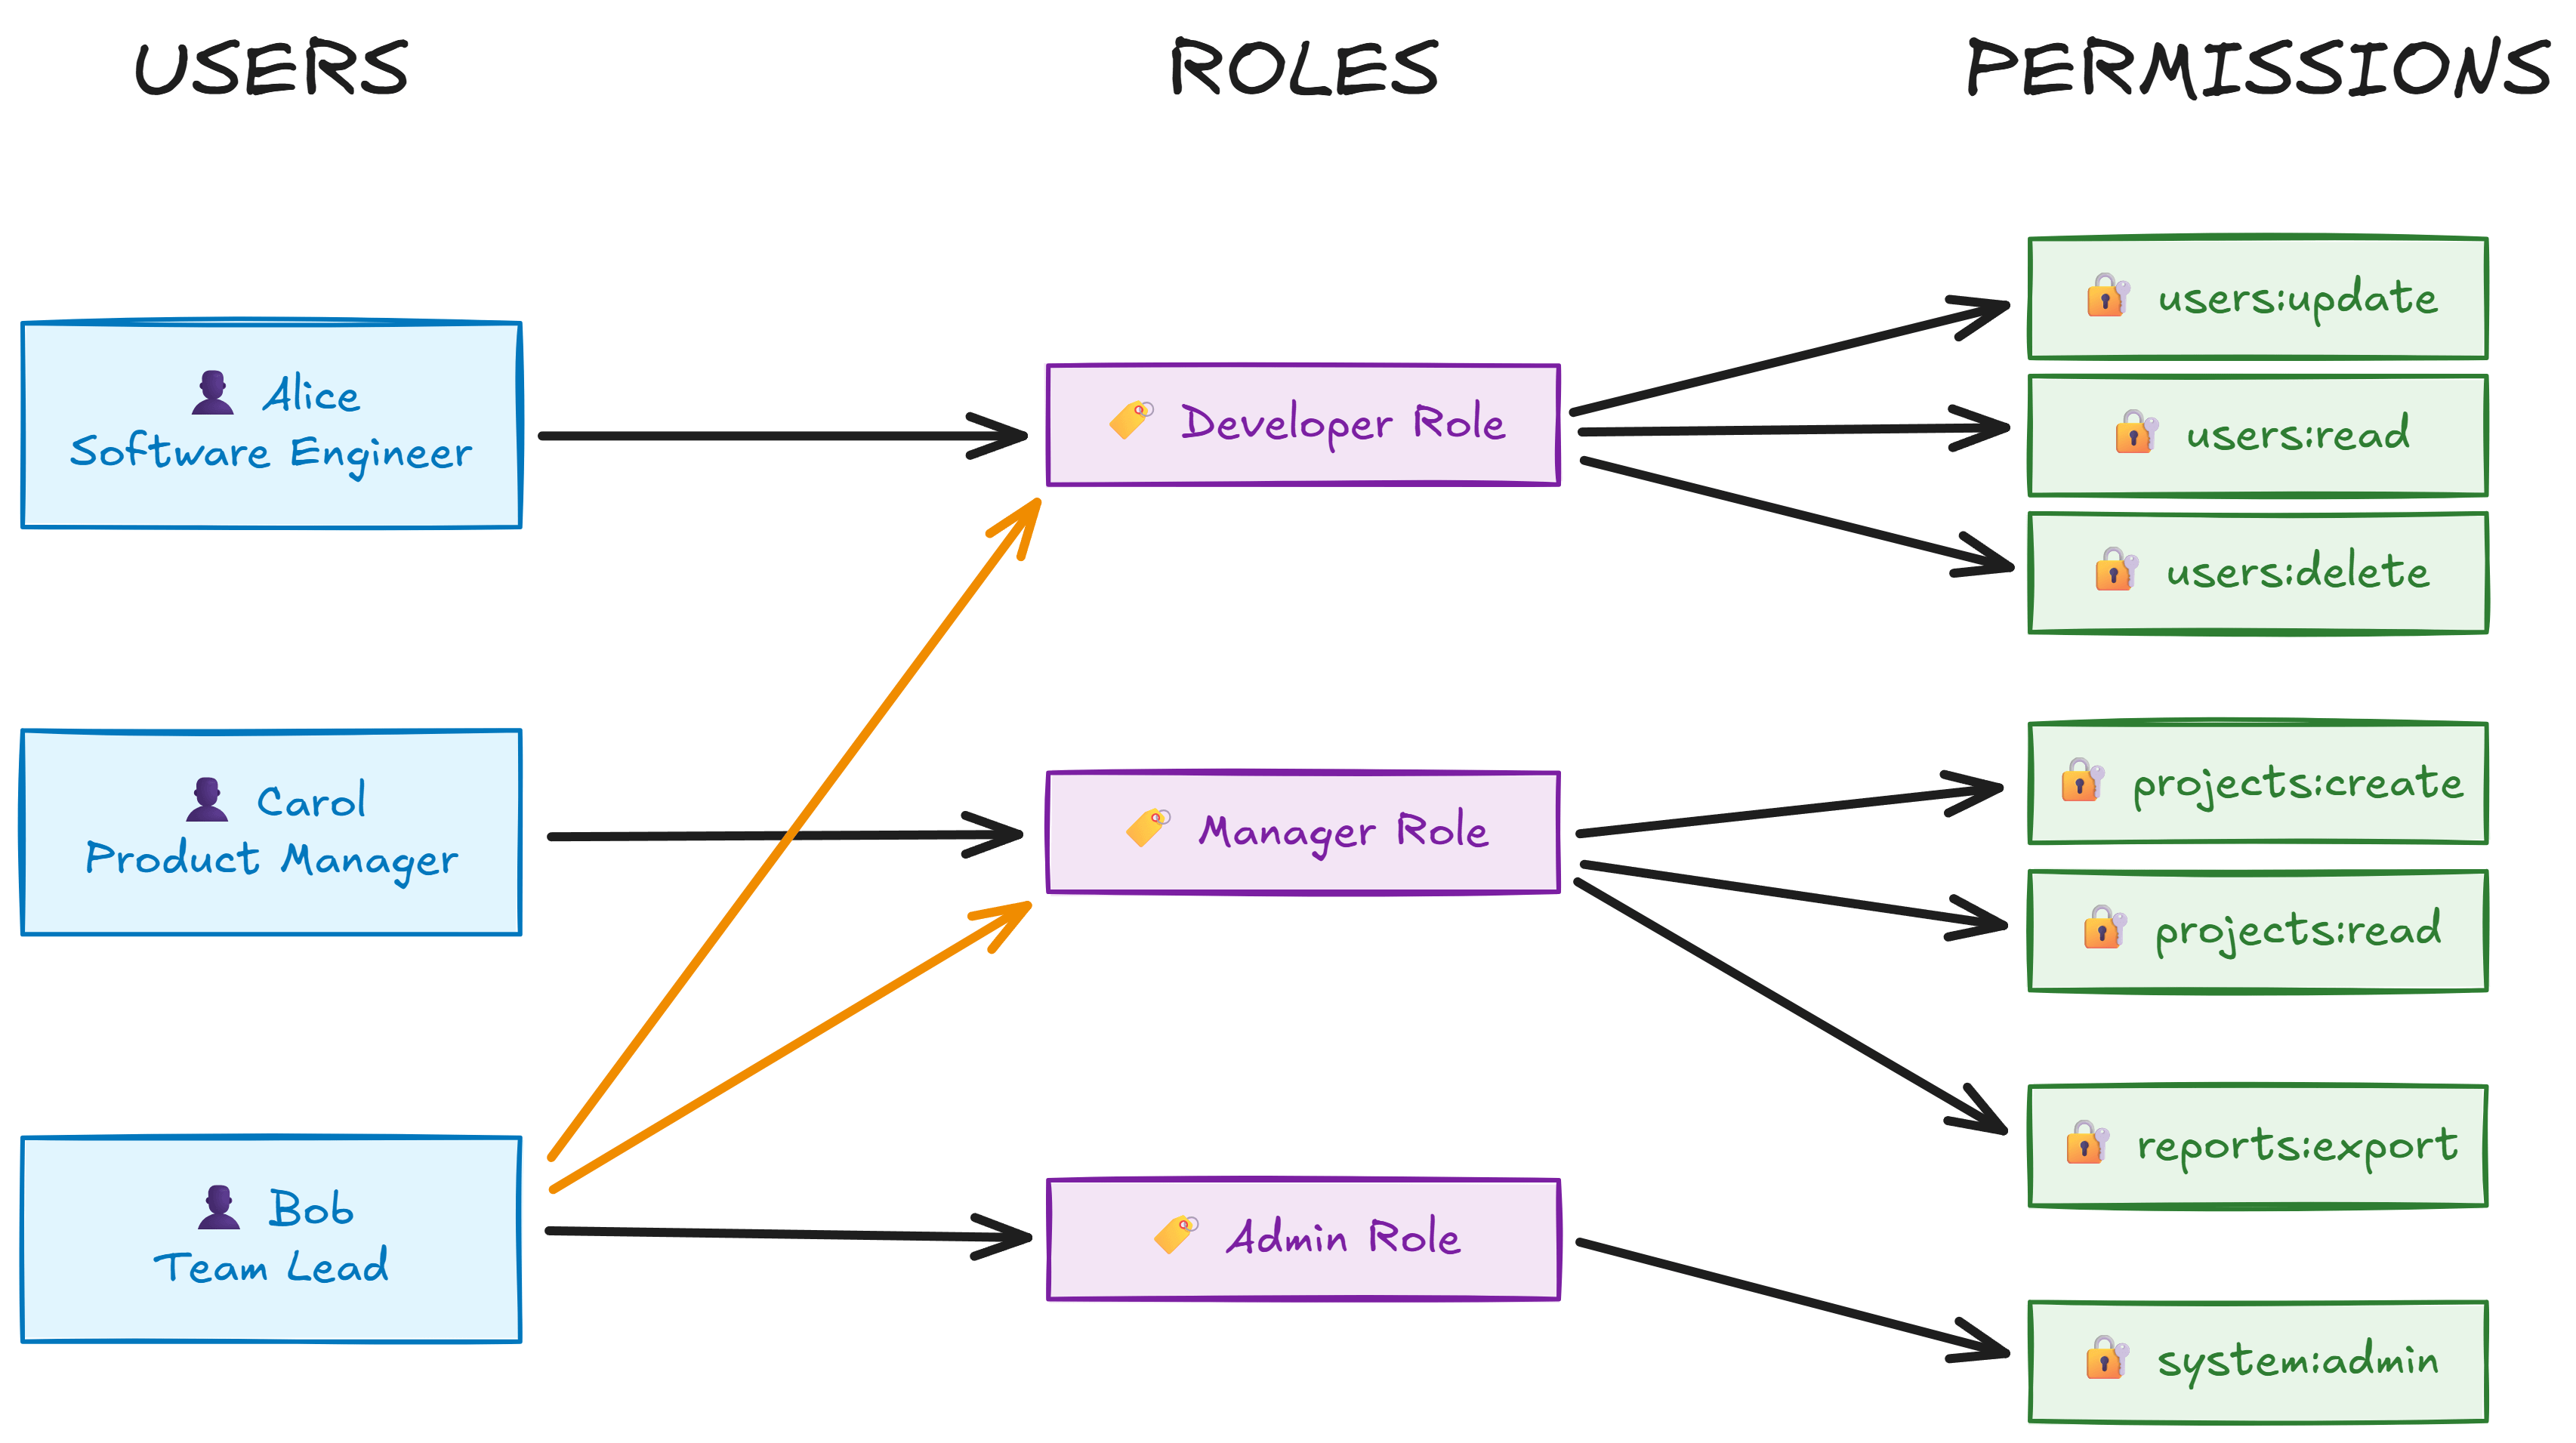
Authentication tells you who the user is. Authorization tells you what they can do.
Most .NET developers start with simple role-based checks: “Is this user an Admin?” But as your application grows, you quickly realize that roles alone aren’t enough. You need granular permissions that can be combined and assigned flexibly.
That’s where Role-Based Access Control (RBAC) shines.
Instead of hardcoding role checks everywhere, you define specific permissions and let roles carry those permissions.
A user might be a Manager role, but what matters is whether they have the users:delete permission.
Let me show you how to build a flexible, permission-based authorization system in ASP.NET Core.
Understanding RBAC Components
RBAC has three key components that work together:
Users → assigned to → Roles → which contain → Permissions
Here’s how it flows:
- Users: Individual people using your system
- Roles: Groups of related permissions (Admin, Manager, Editor)
- Permissions: Specific actions users can perform (users:read, orders:create, reports:delete)
The beauty is in the flexibility.
You can assign multiple roles to a user, and roles can be modified without touching user assignments.
Need to give all Managers the ability to export reports?
Just add the reports:export permission to the Manager role.
This is much more maintainable than checking if someone is specifically an Admin or Super Manager in your code.
It also adds an extra extension point: you can implement custom permissions for some users without creating new roles.
Building a Custom Authorization Handler
ASP.NET Core’s authorization system is built around policies and requirements. Let’s create a custom handler that checks permissions stored in the user’s claims:
public class PermissionAuthorizationRequirement(params string[] allowedPermissions)
    : AuthorizationHandler<PermissionAuthorizationRequirement>, IAuthorizationRequirement
{
    public string[] AllowedPermissions { get; } = allowedPermissions;

    protected override Task HandleRequirementAsync(
        AuthorizationHandlerContext context,
        PermissionAuthorizationRequirement requirement)
    {
        foreach (var permission in requirement.AllowedPermissions)
        {
            bool found = context.User.FindFirst(c =>
                c.Type == CustomClaimTypes.Permission &&
                c.Value == permission) is not null;

            if (found)
            {
                context.Succeed(requirement);
                break;
            }
        }
        return Task.CompletedTask;
    }
}
Here’s what’s happening under the hood:
The class combines both the requirement (what permissions are needed) and the handler (how to check them). This keeps related logic together and reduces boilerplate.
The handler looks through the user’s claims for any claim with type Permission that matches one of the required permissions.
It’s an OR operation - the user only needs one of the specified permissions to proceed.
If a matching permission is found, we call context.Succeed(requirement) and break out early.
No need to check the remaining permissions.
Alternatively, you could implement an AND operation if your use case requires all permissions to be present.
You’ll need to define your custom claim type:
public static class CustomClaimTypes
{
    public const string Permission = "permission";
}
And then you’ll use this when issuing JWT tokens or setting up user claims.
var permissions = await (
        from role in dbContext.Roles
        join permission in dbContext.RolePermissions on role.Id equals permission.RoleId
        where roles.Contains(role.Name)
        select permission.Name)
    .Distinct()
    .ToArrayAsync();

List<Claim> claims =
[
    new(JwtRegisteredClaimNames.Sub, user.Id),
    new(JwtRegisteredClaimNames.Email, user.Email!),
    ..roles.Select(r => new Claim(ClaimTypes.Role, r)),
    ..permissions.Select(p => new Claim(CustomClaimTypes.Permission, p))
];

var tokenDescriptor = new SecurityTokenDescriptor
{
    Subject = new ClaimsIdentity(claims),
    Expires = DateTime.UtcNow.AddMinutes(configuration.GetValue<int>("Jwt:ExpirationInMinutes")),
    SigningCredentials = credentials,
    Issuer = configuration["Jwt:Issuer"],
    Audience = configuration["Jwt:Audience"]
};

var tokenHandler = new JsonWebTokenHandler();

string accessToken = tokenHandler.CreateToken(tokenDescriptor);
Creating Clean APIs with Extension Methods
Raw authorization policies work, but they’re verbose. Let’s create extension methods that make the developer experience much cleaner:
public static class PermissionExtensions
{
    public static void RequirePermission(
        this AuthorizationPolicyBuilder builder,
        params string[] allowedPermissions)
    {
        builder.AddRequirements(new PermissionAuthorizationRequirement(allowedPermissions));
    }
}
Now you can use this with Minimal APIs:
public static class Permissions
{
    public const string UsersRead = "users:read";
    public const string UsersUpdate = "users:update";
    public const string UsersDelete = "users:delete";
}

app.MapGet("me", (ApplicationDbContext dbContext) =>
{
    var user = await dbContext.Users
        .AsNoTracking()
        .Where(u => u.Id == int.Parse(User.FindFirstValue(JwtRegisteredClaimNames.Sub)!))
        .Select(u => new UserDto
        {
            u.Id,
            u.Email,
            u.FirstName,
            u.LastName
        })
        .SingleOrDefaultAsync();

    return Results.Ok(user);
})
.RequireAuthorization(policy => policy.RequirePermission(Permissions.UsersRead));
For MVC Controllers, create an attribute:
[AttributeUsage(AttributeTargets.Method | AttributeTargets.Class)]
public class RequirePermissionAttribute(params string[] permissions) : AuthorizeAttribute
{
    public RequirePermissionAttribute(params string[] permissions)
        : base(policy: string.Join(",", permissions))
    {
    }
}
Then register the policy in your DI container:
builder.Services.AddAuthorizationBuilder()
    .AddPolicy("users:read", policy => policy.RequirePermission(Permissions.UsersRead))
    .AddPolicy("users:update", policy => policy.RequirePermission(Permissions.UsersUpdate));
Usage becomes clean:
[RequirePermission(Permissions.UsersUpdate)]
public async Task<IActionResult> UpdateUser(int id, UpdateUserRequest request)
{
    // Your logic here
}
Extension Points for Production
The basic implementation works great, but we could improve it further. Here are two key extension points:
Type-Safe Permissions with Enums
Instead of magic strings, use enums for compile-time safety:
public enum Permission
{
    UsersRead,
    UsersUpdate,
    UsersDelete,
    OrdersCreate,
    ReportsExport
}
You’ll have to convert these to strings when issuing claims and checking permissions. And also convert from a string to an enum, when reading from claims and validating the permissions.
Server-Side Permission Resolution
Rather than storing all permissions in JWT tokens (which can get large), fetch them server-side using IClaimsTransformation:
public class PermissionClaimsTransformation(IPermissionService permissionService)
    : IClaimsTransformation
{
    public async Task<ClaimsPrincipal> TransformAsync(ClaimsPrincipal principal)
    {
        if (principal.Identity?.IsAuthenticated != true)
        {
            return principal;
        }

        var userId = principal.FindFirst(ClaimTypes.NameIdentifier)?.Value;
        if (userId == null)
        {
            return principal;
        }

        // Fetch permissions from database, then cache
        // IMPORTANT: Cache these results to avoid DB hits on every request
        var permissions = await permissionService.GetUserPermissionsAsync(userId);

        var claimsIdentity = (ClaimsIdentity)principal.Identity;
        foreach (var permission in permissions)
        {
            claimsIdentity.AddClaim(new Claim(CustomClaimTypes.Permission, permission));
        }

        return principal;
    }
}
Register it in your DI container:
builder.Services.AddScoped<IClaimsTransformation, PermissionClaimsTransformation>();
This approach keeps your JWTs lightweight while still providing fast authorization checks through claims.
You can learn more about claims transformation in my previous article.
Takeaway
RBAC transforms authorization from a maintenance headache into a flexible, scalable system.
Start with permissions: Define what actions users can perform, not what roles they have.
Custom authorization handlers give you complete control over how permissions are validated.
Extension methods make the developer experience clean and consistent across your API.
For production systems, consider type-safe enums and server-side permission resolution to keep your tokens lean and your code maintainable.
The result? Authorization logic that’s easy to understand, test, and modify as your application evolves.