Generative AI, governance, and strategic scaling are transforming the software development lifecycle for engineering leaders. Here are 3 key findings from Postman's State of the API Report:
- 89% of devs use AI, but few design for agents.
- 65% of organizations now generate revenue from APIs.
- 51% cite unauthorized AI agent access as a top security risk
SambaNova announced Agents: an open source framework for producing detailed reports and analysis. What used to take hours across 5-8 different apps — research, analysis, formatting, and file creation — can now happen in a single prompt powered by SambaCloud. Generate deep research reports, build deployable html pages, analyze data, and automatically create Jira tickets. Check out Agents today!
Starting a new .NET project is always exciting. But it's also easy to skip the groundwork that makes a project scalable and maintainable.
Before you write your first line of business logic, there are a few key setup steps that make your life (and your teammates) much easier later on.
Here's how I usually set up a new .NET project in six simple steps.
1. Enforce a Consistent Code Style
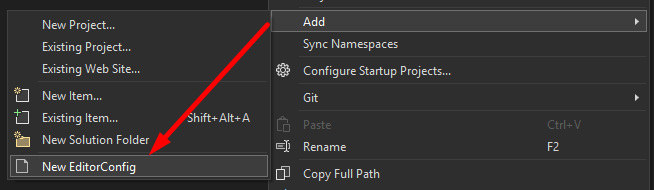
The first thing I add is an .editorconfig file.
This file ensures everyone on your team uses the same formatting and naming conventions, reducing inconsistent indents or random naming rules.
You can create one directly in Visual Studio:
The default configuration is a great start. But you can customize it further to fit your team's preferences.
Place it at the solution root so all projects follow the same rules.
You can still override specific settings in subfolders if needed by placing an .editorconfig file there.
Here are two sample .editorconfig files you can use:
2. Centralize Build Configuration
Next, I add a Directory.Build.props file to the solution root.
This file lets you define build settings that apply to every project in the solution.
Here's an example:
<Project>
  <PropertyGroup>
    <TargetFramework>net10.0</TargetFramework>
    <ImplicitUsings>enable</ImplicitUsings>
    <Nullable>enable</Nullable>
    <TreatWarningsAsErrors>true</TreatWarningsAsErrors>
  </PropertyGroup>
</Project>
This keeps your .csproj files clean and consistent, since there's no need to repeat these properties in every project.
If you later want to enable static analyzers or tweak build options, you can do it once here.
What's cool about this is your .csproj files become basically empty, with only NuGet package references most of the time.
3. Centralize Package Management
As your solution grows, managing NuGet package versions across multiple projects gets painful.
That's where central package management helps.
Create a file named Directory.Packages.props at the root:
<Project>
  <PropertyGroup>
    <ManagePackageVersionsCentrally>true</ManagePackageVersionsCentrally>
  </PropertyGroup>

  <ItemGroup>
    <PackageVersion Include="Microsoft.AspNetCore.OpenApi" Version="10.0.0" />
    <PackageVersion Include="SonarAnalyzer.CSharp" Version="10.15.0.120848" />
  </ItemGroup>
</Project>
Now, when you reference a NuGet package in your project, you don't specify the version. You can only use the package name like this:
<PackageReference Include="Microsoft.AspNetCore.OpenApi" />
All versioning is handled centrally. This makes dependency upgrades trivial and avoids version drift between projects.
You can still override versions in individual projects if needed.
4. Add Static Code Analysis
Static code analysis helps catch potential bugs and maintain code quality. .NET has a set of built-in analyzers, but I like to add SonarAnalyzer.CSharp for more comprehensive checks.
Let's install SonarAnalyzer.CSharp to catch potential code issues early:
Install-Package SonarAnalyzer.CSharp
Add it as a global package reference inside your Directory.Build.props:
<ItemGroup>
  <PackageReference Include="SonarAnalyzer.CSharp" />
</ItemGroup>
Combine this with:
<Project>
  <PropertyGroup>
    <TreatWarningsAsErrors>true</TreatWarningsAsErrors>
    <AnalysisLevel>latest</AnalysisLevel>
    <AnalysisMode>All</AnalysisMode>
    <CodeAnalysisTreatWarningsAsErrors>true</CodeAnalysisTreatWarningsAsErrors>
    <EnforceCodeStyleInBuild>true</EnforceCodeStyleInBuild>
  </PropertyGroup>
</Project>
…and your build will fail on serious code quality issues. This can be a great safety net.
But it can also be noisy at first.
If some rules don't fit your context, you can adjust or suppress them in .editorconfig by setting the rule severity to none.
5. Set Up Local Orchestration
For a consistent local environment across your team, you'll want container orchestration.
You have two main options:
Option 1: Docker Compose
Add Docker Compose support in Visual Studio.
It will scaffold a docker-compose.yml file where you can define services like:
services:
  webapi:
    build: .
  postgres:
    image: postgres:18
    environment:
      POSTGRES_PASSWORD: password
This lets every developer spin up the same stack locally with one command.
Option 2: .NET Aspire
.NET Aspire takes orchestration a step further. It provides service discovery, telemetry, and streamlined configuration, all integrated with your .NET projects. It's become a personal favorite of mine.
You can add a .NET project and a Postgres resource with a few lines of code:
var postgres = builder.AddPostgres("demo-db");

builder.AddProject<WebApi>("webapi")
       .WithReference(postgres)
       .WaitFor(postgres);

builder.Build().Run();
Aspire still uses Docker under the hood but provides a richer developer experience.
Whether you pick Docker Compose or Aspire, the goal is the same: a repeatable, reliable local setup that works the same on every machine.
6. Automate Builds with CI
Finally, I set up a simple GitHub Actions workflow to validate each commit.
Example .github/workflows/build.yml:
name: Build

on:
  push:
    # Filter to only run on main branch
    branches: [main]

jobs:
  build:
    runs-on: ubuntu-latest
    steps:
      - uses: actions/checkout@v4
      - uses: actions/setup-dotnet@v5
        with:
          dotnet-version: 10.0.x
      - run: dotnet restore
      - run: dotnet build --no-restore --configuration Release
      - run: dotnet test --no-build --configuration Release
This ensures your project always builds and passes tests, and it catches issues before they reach production. If the CI build fails, you know something's wrong right away.
When it comes to testing, I highly recommend exploring:
- Architecture testing to enforce architectural rules in your codebase
- Integration testing with Testcontainers to spin up real dependencies in Docker during tests (you can run this locally and in CI)
This will give you confidence that your code works as expected in an (as close as possible) production-like environment.
Wrapping Up
That's a wrap. Your new .NET project is now set up with:
- consistent code style
- centralized build and package management
- code quality enforcement
- reproducible local orchestration
- continuous integration
These small setup steps save countless hours down the road and keep your codebase clean, predictable, and ready to scale.
Once your project setup is solid, the next step is designing scalable boundaries. In my Modular Monolith Architecture course, I show how to grow a .NET application without turning it into a tangled mess, through clear module boundaries, messaging, and domain isolation.
If you're looking for a practical walkthrough of these steps, check out this video.
Thanks for reading.
And stay awesome!